
This page is a living (for now) manual for the SmartLife RGBW controller. I say living, because I am still developing on it as I find new features to add or bugs to fix. Of course, it was meant to be used with SmartThings, but it does have a web interface and can be used independently.
Connecting it to your wifi
When power is first applied it creates a wifi AP titled “espRGBW.[MAC address]”. This is for ease and convenience of adding it to your home network. After connecting to the access point with the password “configme”, you browse to 192.168.4.1 and connect it to your wifi access point. At that point it should reboot and obtain an ip address from your network.
SmartThings Service Manager SmartApp
The service manager is designed to pick up after the above step is complete. You install the SmartApp and run its “discover” mode. It will find all the SmartLife RGBW Controllers on your network. It will also display the IP address that the devices obtained so you can connect to their web interface if you desire. Connecting to their web interface is an optional step as the service manager will configure the switch to work with your SmartThings hub.
The service manager also allows you to create programs for the controller, rename it, and create virtual switches that can start/stop the programs you create. These virtual switches can be used throughout SmartThings to have the created programs trigger based on whatever event you would like. For example, you could have police lights flash when someone opens a door or a motion sensor is tripped. Really the possibilites are endless here.
Web Interface
The web interface has the the following pages:
/ (root)
/advanced (advanced configuration)
/control (relay control)
/update (firmware update)
From here you can do some advanced configuration. You can set a static IP address if you would like. You can also configure a password to use for configuration & firmware update, as well as control. If you do setup a control password here, you must input the password into the device within SmartThings.
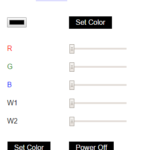
There is also a way to graphically control the controller from the web interface. You can change the color of the LED strip click of the mouse.
Password Protection
The username for password protection of the config and the control is: “admin”
JSON endpoints
On the main page of the device, there is a listing of all the JSON endpoints. Here is a listing of their function.
status: This will return a status of the relay (power) and the switches uptime (uptime).
config: This endpoint is intended to be used by the HA system to send configuration parameters to the switch. You can send the HA hub ip address (haip), communication port, (haport) and default color (dcolor). Default color is what the controller will change to when the “on” command is used. This is also the color it will change to when a physical switch (that is attached to J3) is activated.
on: Turns the device on. It will by default go to its previous color. If the dcolor config option is set, it will go to that instead.
rgb: Control the channels labeled RGB. Accepts value=xxxxxx where xxxxxx is a color value in hex representation. Example: /rgb?value=ffffff
r: Control the R channel of the device. Accepts value=xx where xx is a hex representation of the desired color. Example: /r?value=ff
g: Control the G channel of the device. Accepts value=xx where xx is a hex representation of the desired color. Example: /g?value=ff
b: Control the B channel of the device. Accepts value=xx where xx is a hex representation of the desired color. Example: /b?value=ff
w1: Control the W1 channel of the device. Accepts value=xx where xx is a hex representation of the desired color. Example: /w1?value=ff
w2: Control the W2 channel of the device. Accepts value=xx where xx is a hex representation of the desired color. Example: /w2?value=ff
off: Turns all channels on the device to 0.
program: Send a string that will be parsed into commands for the controller to run. Accepts value, repeat, & off. Documentation for this to come. Example: /program?value=d~ff0000~0-3000_d~0000ff~1000-3000&repeat=-1&off=true
stop: Stops the running program
reboot: Reboots the device
info: Returns the firmware version (version), date (date), and the MAC address (mac) of the device.
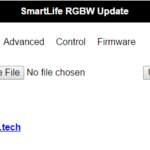
Firmware Update
Updating the firmware is an extremely simple process. You navigate to /update for the switch you are wanting to update, click and select the bin file you downloaded, and hit the “Update” button.
The latest firmware can be found here: https://github.com/erocm123/SmartThingsPublic/raw/master/devicetypes/erocm123/smartlife-rgbw-controller.src/SmartLifeRGBWController.ino.generic.bin
Physical Switch
You can connect a physical switch to the two pins labeled J3 on the board. This must be a momentary switch that is NO (Normally open). If not, if the device reboots, it will boot up into its firmware flashing mode. A typical Decora switch can be converted to a momentary switch following the instructions posted here:
https://community.smartthings.com/t/legrand-adorne-paddle-switch-hack-convert-to-pushbutton/3296
Factory Reset
There are two ways to reset the settings back to their defaults:
- This method might be easier to do with a surge strip with a button attached. Unplug controller and plug back in. Within 2 – 5 seconds after plugging in, unplug and plug back in. Repeat this process 4 times. You can know you are doing it correctly because on the second plug in the LED Strip will light up GREEN, the third it will light up BLUE, and the fourth it will light up RED. After it turns RED, you can just leave it alone. The little red led will blink 5 times slowly and then the RED LED strip will start to flash as the storage is being wiped. After that is finished the LEDs will turn off.
- After the device is turned on, jump J3 for a) between 10-20 seconds will reset the wifi b) between 20-60 seconds will reset everything. If you reset the wifi correctly the little RED LED will blink 3 times quickly. If you reset all the device settings correctly the little RED LED will blink 5 times slowly.
Downloads
Device Handler:
SmartApp:
Firmware:
Great work on the rgb controller. I was wondering if there is a way to set the ip manually like the Sonoff. I’m having a lot of trouble with SSDP 🙁
I will be working on a manual way to add device.
any plans of getting this to work with domoticz
I personally don’t have any plans to get it to work at this time. That being said, it just uses http to communicate and replies in json so it shouldn’t be hard to get it working with other platforms.
nice work! i was planing to integrate my h801 controllers with mqtt, but your solution is much better.
is there any chance you are going to release the arduino source-code? i just ordered some AriLux RGB(W) controllers (they are based on a ESP12 module) from Aliexpress and it would be great to use them with your solution as well.
More info on the AriLux stuff:
https://twitter.com/electromodule/status/769092596044009473
Hello, I have not yet decided to release the source for this product. I do have a firmware built for the AriLux controller, but can’t get it to flash. Is there any trick to getting it into flash mode?
Didn’t have time to try it yet, but here is more information, I’m going to test it with my LC02 (RGBW noIR) modules in the next days.
https://www.muzik.ca/2016/11/30/hacked-esp8266-rgb-led-controller/
I’m going to write my own MQTT based firmware for H801 and the Arilux modules as soon as I got my Smartthings Hub replaced with OpenHAB, i can’t get used to the whole iOS/Android only Device/SmartApp stuff Smartthings does, already sold my hub 🙂
Hello,
I’ve installed the smart app.
And the two device controllers.
Verified that the wifi system. Works with the native app.
Upon running the ST discovery process, the controller is not recognized.
Am I missing something with the set up here?
Thank you very much!
“Verified that the wifi system. Works with the native app” Just want to verify what this means. Can you connect the web page for the device after flashing the firmware and control the strips? ie http://ipaddress/control
https://github.com/erocm123/SmartThingsPublic/raw/master/devicetypes/erocm123/smartlife-rgbw-controller.src/AriLux_AL-LC02.ino.generic.bin
hello – Thanks for the quick reply. I’m thinking I ordered the wrong controller. This is what I have provisioned and am attempting to integrate into ST controller. Did I order the wrong device? https://www.amazon.com/gp/product/B01JZ2SI6Q/ref=oh_aui_detailpage_o00_s01?ie=UTF8&psc=1
the “native app” comment – i am referring to the playstore application that drives the wifi controller. it is called Magic Home.
The more I read your article, the more certain that I purchased the wrong controller. To what controller does this SmartApp Support?
Thanks.
Ray
That controller should work, but it needs to be flashed via an FTDI adapter with a custom firmware. There are instructions for that controller in particular here:
https://community.smartthings.com/t/release-smartlife-h801-rgbw-led-strip-wifi-controller-bulb/51182
Look under the Arilux section.
oops.. that cut/paste didn’t work right..
https://github.com/erocm123/SmartThingsPublic/raw/master/devicetypes/erocm123/smartlife-rgbw-controller.src/AriLux_AL-LC02.ino.generic.bin
Thanks!! I appreciate the mentoring.
Thanks. After flashing – it worked perfectly.
I appreciate all the community information
I followed the instructions, flashed the H801 RGBW LED controller with your firmware, and I am able to control it from the web interface. After adding the SmartThings app and both device handlers to my ST account, the SmartThings app is able to automatically discover the LED controller and add it to the ST app on my phone. The problem is that I can not operate the LED controller from within the ST app. When I attempt to turn it on or off, I get a “java.lang.ArrayIndexOutOfBoundsException” on the ST Live logging screen. I know that the controller is communicating with my ST Hub (v2) because when I change the settings for the LED controller from the web interface, the new settings are reported on the Live Logging screen of my ST account. Any ideas?? Thanks.
Can you post the full error? I specifically need the line number.
Thanks for the reply. The “Live Logging” screen within the SmartThings IDE doesn’t give line numbers for the error. Is there a way to turn on more verbose logging? Here is the full log. To generate the events in the log below, I attempted to turn the controller on, off, and change colors from the Smart App within the SmartThings app on my iPhone. If it makes any difference, I added your github repo to my SmartThings IDE and pulled the device handlers and Smart App code down from github, rather than cut/paste from there so that I could easily update when there are changes. I will post the version numbers of the firmware on the controller, device handlers, and Smart App below just in case I pulled down old code. Is there any type of third party proxy server that needs to be run for this to work? I have a couple of other smart apps that require Node JS to act as a middle man for the commands between the devices and SmartThings. I noticed that you mentioned that you created a “Service Manager” for this project. Is that part of the Smart App code? Thanks for your help on this!
Versions:
Controller Firmware – “version”:”2.0.6″, “date”:”Mar 21 2017 22:35:01″
Smart App – Date: 2016-06-23
erocm123 : SmartLife RGBW Controller – Date: 2016-12-10
erocm123 : SmartLife RGBW Virtual Switch – This one doesn’t list a date at the top of the code.
Log:
b286a560-c087-4661-a1a0-6768a61a103c 2:47:13 AM: error java.lang.ArrayIndexOutOfBoundsException
b286a560-c087-4661-a1a0-6768a61a103c 2:47:10 AM: debug /rgb?value=4250cf&channels=false&transition=0
b286a560-c087-4661-a1a0-6768a61a103c 2:47:10 AM: debug setting color with hex
b286a560-c087-4661-a1a0-6768a61a103c 2:47:10 AM: debug setColor being called with [red:80, hex:#505EFF, blue:255, saturation:68.62745098039215, hue:65.33333333333333, green:94, alpha:1]
b286a560-c087-4661-a1a0-6768a61a103c 2:47:01 AM: error java.lang.ArrayIndexOutOfBoundsException
b286a560-c087-4661-a1a0-6768a61a103c 2:47:00 AM: error java.lang.ArrayIndexOutOfBoundsException
b286a560-c087-4661-a1a0-6768a61a103c 2:47:00 AM: debug /rgb?value=000000&channels=false&transition=0
b286a560-c087-4661-a1a0-6768a61a103c 2:47:00 AM: debug /w2?value=d0&channels=false&transition=0
b286a560-c087-4661-a1a0-6768a61a103c 2:47:00 AM: debug level: 208
b286a560-c087-4661-a1a0-6768a61a103c 2:47:00 AM: debug setwhite2Level: 81
b286a560-c087-4661-a1a0-6768a61a103c 2:47:00 AM: debug setColor being called with [aLevel:81]
b286a560-c087-4661-a1a0-6768a61a103c 2:46:59 AM: debug /on?transition=0
b286a560-c087-4661-a1a0-6768a61a103c 2:46:59 AM: debug on()
b286a560-c087-4661-a1a0-6768a61a103c 2:46:59 AM: debug setLevel() level = 81
b286a560-c087-4661-a1a0-6768a61a103c 2:46:45 AM: error java.lang.ArrayIndexOutOfBoundsException
b286a560-c087-4661-a1a0-6768a61a103c 2:46:43 AM: debug /off?transition=0
b286a560-c087-4661-a1a0-6768a61a103c 2:46:43 AM: debug off()
b286a560-c087-4661-a1a0-6768a61a103c 2:46:32 AM: error java.lang.ArrayIndexOutOfBoundsException
b286a560-c087-4661-a1a0-6768a61a103c 2:46:32 AM: debug /on?transition=0
b286a560-c087-4661-a1a0-6768a61a103c 2:46:32 AM: debug on()
You do need to install the SmartLife RGBW (Connect) SmartApp. https://github.com/erocm123/SmartThingsPublic/blob/master/smartapps/erocm123/smartlife-rgbw-light-connect.src/smartlife-rgbw-light-connect.groovy
This is a service manager that finds the controller and installs it into SmartThings.
I figured it out! I set a password to control and configure the device, and forgot to set the same password in the smart app. It works now. I have a few questions…
My LED’s do not seem bright enough with the brightness set to 100% within the smart app. I remember reading in the ST forum that someone found an error in some of your code that reduced the brightness level of the LEDs. In a later post you said that you corrected that code. What are the current versions of your software so that I can compare what I have setup and ensure that I’m on the latest releases?
My controller firmware is at “version”:”2.0.6″, “date”:”Mar 21 2017 22:35:01″. Is that the latest firmware available?
I’m interested in using a momentary button to turn the controller on and off via the J3 pins. Do you have to enable that feature anywhere, or is it hard coded to act that way when the J3 pins are momentarily shorted?
Are there any plans to add in functionality to return to the previous state once a program ends, instead of just “off” or staying on the last color that was set by the program?
Finally, have you added the ability to sink more that one controller together from the ST app, or is a third party app needed in order to sync them?
Sorry for all of the questions, but I bought and flashed 5 of these controllers, so I’m pretty invested in your software. Thanks a lot and great job!!
-Jason
So there were a couple bugs that I recently corrected but the first one was related to color accuracy and the second was the hex color that was reported back to the user. There wasn’t one really related to brightness. You will want to update the firmware as there is a new one that has more accurate color reporting back to the user. It doesn’t sound like it will fix your issue, but maybe. Also, I need to start dating the device handler, but if you have github integration it should show up as needing an update. Update the handler and the SmartApp to the latest version.
The J3 momentary button is on by default but can be turned off in /advanced.
As for the last two questions, Syncing has been considered, but it would take a lot of changes in the code to switch from TCP type connections to UDP. It would be a long way down the road if I did work on it. I believe there are SmartApps out there that can keep multiple devices in sync though.
I haven’t thought about returning to the previous state when a program finishes, but will see what I can do about implementing it.
Ok I will update the device handler and smart app. Thanks for looking into implementing the previous state functionality. I think that it would look very cool if the lights faded out as the program completed, and the previously selected color faded in quickly afterwards. Just a thought. Thanks!
erocm123: Do you think that you could add an option within the web config of the controller that disables the factory reset procedure via the unplug-plug-unplug method? The reason that I ask is because I am trying to use the controller in conjunction with a switched outlet to provide under counter lighting. It works great with the option to turn the controller on when power is provided, but my kids will inevitably play with the switch and turn the under counter lights on and off multiple times; which will reset the controller. I think that the option to reset the controller using the J3 jumper method would work for me as an alternative unplug-plug-unplug method. I just need the option to disable that method. Thanks!
Sure, I think I will create the option to either a) use J3 as reset, b) use unplug method, or c) use both. I just don’t want to have a scenario where a user can lock themselves out of a reset.
Have you had a chance to add these reset options to the firmware yet? I’d love to re-flash the controller and be able to use it for my under counter lighting without worrying about my kids resetting it every other day! Thanks!!
I have added it, but have not had a chance to upload the new firmware. I will try to do it within the next few days.
Great, thanks!
I have uploaded the firmware that lets you choose the reset method.
I was really intrigued when I found the H801 RGBW controller and even more so when I stumbled upon Eric’s great work…so I ordered a few H801s, got the latest firmware loaded on them (2.0.6), and successfully added the Device Handlers and Smart App, Rebooted the H801 devices and configured them for my WiFi…perfect! I can browse to the configuration page of each H801 without any problem…then I added the SmartLife Service Manager to my Android phone SmartThings app…and attempted to discover the H801 devices…and nothing…didn’t find a thing…rebooted the SmartThings hub and H801 devices just in case…even restarted the SmartThings app on my phone…and nothing…Installed the Smart App Service Manager and SmartThings app on my iPad…same results…no devices are being discovered…I can see the attempts in the Live Logging too! Any thoughts???…
db5e58b0-be26-40e5-8b70-57e080b3c54a 7:58:06 PM: debug verifyDevices()
db5e58b0-be26-40e5-8b70-57e080b3c54a 7:58:06 PM: debug getChildDevices(false), children=0
db5e58b0-be26-40e5-8b70-57e080b3c54a 7:58:03 PM: debug getChildDevices(false), children=0
54150d42-4c5e-4315-ab69-bc22b80bf633 7:58:02 PM: trace getPhrases(), state.welcomeIssue = null
64c5d673-b22d-449a-8688-51d3d1e2c23e 7:57:05 PM: debug getChildDevices(false), children=0
64c5d673-b22d-449a-8688-51d3d1e2c23e 7:57:05 PM: info in ssdpDiscover
Thanks for any help!
Do you have any wireless repeaters, bridges, business grade AP, or any other funky network stuff going on? You can always add the controllers manually in the SmartApp if discovery isn’t working for you.
Yes…I have a repeater downstairs, however, I was able to add the devices manually. Then, as I was testing, and getting the devices to work with the Amazon Echo/Alexa, I deleted one of the controllers completely…when attempting to re-add the device manually, it never configures again in the SmartLife RGBW Light (Connect) SmartApp…just says “Device has not fully configured…” here is a sample of the live log during and after the manual addition of the device (192.168.1.202 which is statically assigned thru the H801 web interface)…
10f02597-728a-4435-9ab5-40fe8e522d77 8:20:35 AM: debug {“rgb”:”000000″, “r”:”00″, “g”:”00″, “b”:”00″, “w1″:”00”, “w2″:”00”, “power”:”off”, “running”:”false”, “program”:”0″, “uptime”:”2 days and 18:0:11″, “version”:”2.0.6″, “date”:”Apr 10 2017 18:24:07″}
fd122326-c336-46e0-ae60-87f9509f9aaa 8:19:46 AM: debug getChildDevices(false), children=3
3e61b5b1-6ee5-4137-9662-5b730e916522 8:19:45 AM: debug {“name”:”transitionspeed”, “value”:”1″, “success”:”true”, “type”:”configuration”}
3e61b5b1-6ee5-4137-9662-5b730e916522 8:19:44 AM: debug {“name”:”dcolor”, “value”:””, “success”:”true”, “type”:”configuration”}
3e61b5b1-6ee5-4137-9662-5b730e916522 8:19:43 AM: debug {“name”:”pos”, “value”:”0″, “success”:”true”, “type”:”configuration”}
3e61b5b1-6ee5-4137-9662-5b730e916522 8:19:43 AM: debug {“name”:”haport”, “value”:”39500″, “success”:”true”, “type”:”configuration”}
3e61b5b1-6ee5-4137-9662-5b730e916522 8:19:42 AM: debug {“name”:”haip”, “value”:”192.168.1.9″, “success”:”true”}
fd122326-c336-46e0-ae60-87f9509f9aaa 8:19:41 AM: debug getChildDevices(false), children=3
485632e0-85fc-41c4-a359-419d09ae8265 8:19:41 AM: debug /configGet?name=transitionspeed
485632e0-85fc-41c4-a359-419d09ae8265 8:19:41 AM: debug /configGet?name=dcolor
485632e0-85fc-41c4-a359-419d09ae8265 8:19:41 AM: debug /configGet?name=pos
485632e0-85fc-41c4-a359-419d09ae8265 8:19:41 AM: debug /configSet?name=haport&value=39500
485632e0-85fc-41c4-a359-419d09ae8265 8:19:41 AM: debug /configSet?name=haip&value=192.168.1.9
fd122326-c336-46e0-ae60-87f9509f9aaa 8:19:41 AM: debug getChildDevices(false), children=3
3e61b5b1-6ee5-4137-9662-5b730e916522 8:16:57 AM: debug {“name”:”transitionspeed”, “value”:”1″, “success”:”true”, “type”:”configuration”}
fd122326-c336-46e0-ae60-87f9509f9aaa 8:16:57 AM: debug getChildDevices(false), children=3
3e61b5b1-6ee5-4137-9662-5b730e916522 8:16:57 AM: debug {“name”:”dcolor”, “value”:””, “success”:”true”, “type”:”configuration”}
3e61b5b1-6ee5-4137-9662-5b730e916522 8:16:56 AM: debug {“name”:”pos”, “value”:”0″, “success”:”true”, “type”:”configuration”}
3e61b5b1-6ee5-4137-9662-5b730e916522 8:16:55 AM: debug {“name”:”haport”, “value”:”39500″, “success”:”true”, “type”:”configuration”}
3e61b5b1-6ee5-4137-9662-5b730e916522 8:16:54 AM: debug {“name”:”haip”, “value”:”192.168.1.9″, “success”:”true”}
fd122326-c336-46e0-ae60-87f9509f9aaa 8:16:54 AM: debug getChildDevices(false), children=3
485632e0-85fc-41c4-a359-419d09ae8265 8:16:54 AM: debug /configGet?name=transitionspeed
485632e0-85fc-41c4-a359-419d09ae8265 8:16:54 AM: debug /configGet?name=dcolor
485632e0-85fc-41c4-a359-419d09ae8265 8:16:54 AM: debug /configGet?name=pos
485632e0-85fc-41c4-a359-419d09ae8265 8:16:54 AM: debug /configSet?name=haport&value=39500
485632e0-85fc-41c4-a359-419d09ae8265 8:16:54 AM: debug /configSet?name=haip&value=192.168.1.9
fd122326-c336-46e0-ae60-87f9509f9aaa 8:16:53 AM: debug getChildDevices(false), children=3
fd122326-c336-46e0-ae60-87f9509f9aaa 8:16:49 AM: debug getChildDevices(false), children=3
3e61b5b1-6ee5-4137-9662-5b730e916522 8:16:48 AM: debug {“name”:”transitionspeed”, “value”:”1″, “success”:”true”, “type”:”configuration”}
3e61b5b1-6ee5-4137-9662-5b730e916522 8:16:47 AM: debug {“name”:”dcolor”, “value”:””, “success”:”true”, “type”:”configuration”}
3e61b5b1-6ee5-4137-9662-5b730e916522 8:16:47 AM: debug {“name”:”pos”, “value”:”0″, “success”:”true”, “type”:”configuration”}
3e61b5b1-6ee5-4137-9662-5b730e916522 8:16:46 AM: debug {“name”:”haport”, “value”:”39500″, “success”:”true”, “type”:”configuration”}
3e61b5b1-6ee5-4137-9662-5b730e916522 8:16:45 AM: debug {“name”:”haip”, “value”:”192.168.1.9″, “success”:”true”}
fd122326-c336-46e0-ae60-87f9509f9aaa 8:16:44 AM: debug getChildDevices(false), children=3
485632e0-85fc-41c4-a359-419d09ae8265 8:16:44 AM: debug /configGet?name=transitionspeed
485632e0-85fc-41c4-a359-419d09ae8265 8:16:44 AM: debug /configGet?name=dcolor
485632e0-85fc-41c4-a359-419d09ae8265 8:16:44 AM: debug /configGet?name=pos
485632e0-85fc-41c4-a359-419d09ae8265 8:16:44 AM: debug /configSet?name=haport&value=39500
485632e0-85fc-41c4-a359-419d09ae8265 8:16:44 AM: debug /configSet?name=haip&value=192.168.1.9
fd122326-c336-46e0-ae60-87f9509f9aaa 8:16:43 AM: debug getChildDevices(false), children=3
fd122326-c336-46e0-ae60-87f9509f9aaa 8:16:42 AM: debug getChildDevices(false), children=3
5b476ccf-e4e6-4b7d-ae76-2ad8514ce15b 8:16:04 AM: debug {“rgb”:”000000″, “r”:”00″, “g”:”00″, “b”:”00″, “w1″:”00”, “w2″:”00”, “power”:”off”, “running”:”false”, “program”:”0″, “uptime”:”15:5:5″, “version”:”2.0.6″, “date”:”Apr 10 2017 18:24:07″}
3e61b5b1-6ee5-4137-9662-5b730e916522 8:15:35 AM: debug {“name”:”transitionspeed”, “value”:”1″, “success”:”true”, “type”:”configuration”}
10f02597-728a-4435-9ab5-40fe8e522d77 8:15:35 AM: debug {“rgb”:”000000″, “r”:”00″, “g”:”00″, “b”:”00″, “w1″:”00”, “w2″:”00”, “power”:”off”, “running”:”false”, “program”:”0″, “uptime”:”2 days and 17:55:11″, “version”:”2.0.6″, “date”:”Apr 10 2017 18:24:07″}
3e61b5b1-6ee5-4137-9662-5b730e916522 8:15:35 AM: debug {“name”:”dcolor”, “value”:””, “success”:”true”, “type”:”configuration”}
3e61b5b1-6ee5-4137-9662-5b730e916522 8:15:34 AM: debug {“name”:”haport”, “value”:”39500″, “success”:”true”, “type”:”configuration”}
3e61b5b1-6ee5-4137-9662-5b730e916522 8:15:34 AM: debug {“name”:”pos”, “value”:”0″, “success”:”true”, “type”:”configuration”}
3e61b5b1-6ee5-4137-9662-5b730e916522 8:15:33 AM: debug {“name”:”haip”, “value”:”192.168.1.9″, “success”:”true”}
fd122326-c336-46e0-ae60-87f9509f9aaa 8:15:32 AM: debug getChildDevices(false), children=3
485632e0-85fc-41c4-a359-419d09ae8265 8:15:32 AM: debug /configGet?name=transitionspeed
485632e0-85fc-41c4-a359-419d09ae8265 8:15:32 AM: debug /configGet?name=dcolor
485632e0-85fc-41c4-a359-419d09ae8265 8:15:32 AM: debug /configGet?name=pos
485632e0-85fc-41c4-a359-419d09ae8265 8:15:32 AM: debug /configSet?name=haport&value=39500
485632e0-85fc-41c4-a359-419d09ae8265 8:15:32 AM: debug /configSet?name=haip&value=192.168.1.9
fd122326-c336-46e0-ae60-87f9509f9aaa 8:15:32 AM: debug getChildDevices(false), children=3
fd122326-c336-46e0-ae60-87f9509f9aaa 8:15:26 AM: debug getChildDevices(false), children=3
fd122326-c336-46e0-ae60-87f9509f9aaa 8:15:25 AM: debug getChildDevices(false), children=3
fd122326-c336-46e0-ae60-87f9509f9aaa 8:15:21 AM: debug Creating RGBW Controller device with dni: c0a801ca:0050
485632e0-85fc-41c4-a359-419d09ae8265 8:15:21 AM: debug /configGet?name=transitionspeed
485632e0-85fc-41c4-a359-419d09ae8265 8:15:21 AM: debug /configGet?name=dcolor
485632e0-85fc-41c4-a359-419d09ae8265 8:15:21 AM: debug /configGet?name=pos
485632e0-85fc-41c4-a359-419d09ae8265 8:15:21 AM: debug /configSet?name=haport&value=39500
485632e0-85fc-41c4-a359-419d09ae8265 8:15:21 AM: debug /configSet?name=haip&value=192.168.1.9
485632e0-85fc-41c4-a359-419d09ae8265 8:15:21 AM: debug installed()
fd122326-c336-46e0-ae60-87f9509f9aaa 8:15:02 AM: debug getChildDevices(false), children=2
fd122326-c336-46e0-ae60-87f9509f9aaa 8:14:56 AM: debug getChildDevices(false), children=2
3e61b5b1-6ee5-4137-9662-5b730e916522 8:14:55 AM: debug {“name”:”transitionspeed”, “value”:”1″, “success”:”true”, “type”:”configuration”}
fd122326-c336-46e0-ae60-87f9509f9aaa 8:14:54 AM: debug getChildDevices(false), children=2
3e61b5b1-6ee5-4137-9662-5b730e916522 8:14:54 AM: debug {“name”:”dcolor”, “value”:””, “success”:”true”, “type”:”configuration”}
3e61b5b1-6ee5-4137-9662-5b730e916522 8:14:53 AM: debug {“name”:”pos”, “value”:”0″, “success”:”true”, “type”:”configuration”}
3e61b5b1-6ee5-4137-9662-5b730e916522 8:14:53 AM: debug {“name”:”haport”, “value”:”39500″, “success”:”true”, “type”:”configuration”}
3e61b5b1-6ee5-4137-9662-5b730e916522 8:14:52 AM: debug {“name”:”haip”, “value”:”192.168.1.9″, “success”:”true”}
3e61b5b1-6ee5-4137-9662-5b730e916522 8:14:52 AM: debug {“name”:”transitionspeed”, “value”:”1″, “success”:”true”, “type”:”configuration”}
fd122326-c336-46e0-ae60-87f9509f9aaa 8:14:51 AM: debug getChildDevices(false), children=3
3e61b5b1-6ee5-4137-9662-5b730e916522 8:14:51 AM: debug {“name”:”dcolor”, “value”:””, “success”:”true”, “type”:”configuration”}
3e61b5b1-6ee5-4137-9662-5b730e916522 8:14:51 AM: debug {“name”:”pos”, “value”:”0″, “success”:”true”, “type”:”configuration”}
b8882e69-69c5-4c4a-840c-1d5186e97c21 8:14:50 AM: debug /configGet?name=transitionspeed
b8882e69-69c5-4c4a-840c-1d5186e97c21 8:14:50 AM: debug /configGet?name=dcolor
b8882e69-69c5-4c4a-840c-1d5186e97c21 8:14:50 AM: debug /configGet?name=pos
b8882e69-69c5-4c4a-840c-1d5186e97c21 8:14:50 AM: debug /configSet?name=haport&value=39500
b8882e69-69c5-4c4a-840c-1d5186e97c21 8:14:50 AM: debug /configSet?name=haip&value=192.168.1.9
3e61b5b1-6ee5-4137-9662-5b730e916522 8:14:50 AM: debug {“name”:”haport”, “value”:”39500″, “success”:”true”, “type”:”configuration”}
3e61b5b1-6ee5-4137-9662-5b730e916522 8:14:49 AM: debug {“name”:”haip”, “value”:”192.168.1.9″, “success”:”true”}
fd122326-c336-46e0-ae60-87f9509f9aaa 8:14:48 AM: debug getChildDevices(false), children=3
b8882e69-69c5-4c4a-840c-1d5186e97c21 8:14:48 AM: debug /configGet?name=transitionspeed
b8882e69-69c5-4c4a-840c-1d5186e97c21 8:14:48 AM: debug /configGet?name=dcolor
b8882e69-69c5-4c4a-840c-1d5186e97c21 8:14:48 AM: debug /configGet?name=pos
b8882e69-69c5-4c4a-840c-1d5186e97c21 8:14:48 AM: debug /configSet?name=haport&value=39500
b8882e69-69c5-4c4a-840c-1d5186e97c21 8:14:48 AM: debug /configSet?name=haip&value=192.168.1.9
fd122326-c336-46e0-ae60-87f9509f9aaa 8:14:47 AM: debug getChildDevices(false), children=3
Sorry for the late reply. I have changed my blogging platform and was not getting notifications of comments.
If you are still getting the message you posted, try going into the H801 device and hit the configure button and the refresh button. Watch the logs as you should see the MAC address detected for the device and the DNI should get updated to the MAC address. Sometimes wifi repeaters can cause funky stuff with SmartThings seeing the correct MAC address which is why I asked. As a last resort you can try to change the DNI of the H801 to it’s MAC address in the IDE. It should be input with out any delimiter characters and all upper case.
Any chances of getting the amount of watts being used by the H801 Controller on the device handler??
Unfortunately the H801 does not have the hardware required to measure power or energy consumption.
Hi there… I am having difficulty getting the access point, I mean I have flashed it successfully and but now I can’ t see any access point on either of them, PC or Phone. I am new to this flashing thing so would appriciate it if someone please help me out here… cheers
Try doing a factory reset as described in the article above.
Amazing work! I am using your sonof firmware and device handlers with excellent success.
Any change you have the firmware for the ARILUX® AL-LC08? I bought a few and I can’t wait to try this firmware on them.
Yep, you can find the firmware here: https://github.com/erocm123/SmartThingsPublic/tree/master/devicetypes/erocm123/smartlife-rgbw-controller.src
Great! Thanks so much. Using your firmware and some advice you gave on the smartthings forums I was able to get it up and running. Unfortunately my strip has the red/green reversed. But it is working as expected, because this strip before the flash was also reversed.
Is there anyway to add a “swap red/green” to the firmware options?
Yeah, it seems that there is some inconsistency in the controller and some LED strips. I will add an option to swap the two channels.
I just uploaded a new firmware that allows you to swap R & G settings from the devices web interface. Let me know if it works for you.