
As I am likely done developing on this great little relay, I wanted to write a short post regarding how to interact with it. Of course, it was meant to be used with SmartThings, but it does have a web interface and can be used independently.
Connecting it to your wifi
When power is first applied it creates a wifi AP titled “Sonoff.[MAC address]”. This is for ease and convenience of adding it to your home network. After connecting to the access point with the password “configme”, you browse to 192.168.4.1 and connect it to your wifi access point. At that point it should reboot and obtain an ip address from your network.
SmartThings Service Manager SmartApp
The service manager is designed to pick up after the above step is complete. You install the SmartApp and run its “discover” mode. It will find all the Sonoff switches on your network. It will also display the IP address that the switches obtained so you can connect to their web interface if you desire. Connecting to their web interface is an optional step as the service manager will configure the switch to work with your SmartThings hub.
Web Interface
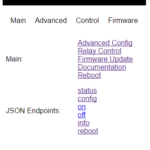
The web interface has the the following pages:
/ (root)
/advanced (advanced configuration)
/control (relay control)
/update (firmware update)
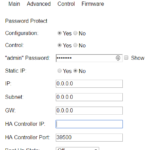
From here you can do some advanced configuration. You can set a static IP address if you would like. You can also configure a password to use for configuration & firmware update, as well as control. If you do setup a control password here, you must input the password into the device within SmartThings. You can also set the Boot Up state from here, although that can also be configured within SmartThings.
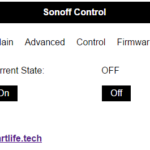
There is also a way to graphically control the relay from the web interface. You can turn it on or off with a click of the mouse.
Password Protection
The username for password protection of the config and the control is: “admin”
JSON endpoints
On the main page of the device, there is a listing of all the JSON endpoints. Here is a listing of their function.
status: This will return a status of the relay (power) and the switches uptime (uptime).
config: This endpoint is intended to be used by the HA system to send configuration parameters to the switch. You can send the HA hub ip address (haip), communication port, (haport) and “power on state” (pos).
on: Turns the relay on.
off: Turns the relay off.
reboot: Reboots the device
info: Returns the firmware version (version), date (date), and the MAC address (mac) of the device.
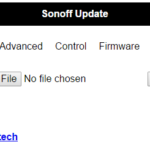
Firmware Update
Updating the firmware is an extremely simple process. You navigate to /update for the switch you are wanting to update, click and select the bin file you downloaded, and hit the “Update” button.
The latest firmware can be found here: https://github.com/erocm123/SmartThingsPublic/tree/master/devicetypes/erocm123/sonoff-wifi-switch.src
Factory Reset
You can reset the devices wifi & network configuration settings by holding the switch down on the device for 10 – 20 seconds. You can reset all of the settings on the device (useful if you forget the configuration password) by holding down the switch for 20 – 60 seconds.
Downloads
Device Handler: https://github.com/erocm123/SmartThingsPublic/blob/master/devicetypes/erocm123/sonoff-wifi-switch.src/sonoff-wifi-switch.groovy
Where to Buy
It just so happens that Itead is having a promotional sale on their products. Click through to this link to get some great smart home gear at up to 20 – 30 % off!
Great work Eric! Thanks for sharing it!! The “Sonoff Documentation” article nicely covers the configuration/use of an Sonoff flashed with your latest firmware, but it doesn’t cover HOW the initial OEM firmware replacement is accomplished. I read the earlier article “Sonoff WiFi Switch & Smart Things”; since the device is the same (Sonoff), I assume this same technique is the same one employed to reflash an OEM Sonoff directly to the latest version firmware (no intermediates steps?). So I just grab your ESPEasy Firmware Flash Tool and either the sonoff.ino.generic.bin or sonoff-wifi-sw-groovy firmware and replace the OEM firmware?
Yes, to do the initial flash you can use the instructions from the post you referenced:
https://smartlifeautomated.wordpress.com/2016/04/21/sonoff-wifi-switch-smartthings/
To make it even simpler, you can just connect the FTDI adapter as described and run the following command from the directory that you have extracted the ESP Easy Flashing Tool to:
esptool.exe -vv -cd nodemcu -cb 115200 -cp COM6 -ca 0x00000 -cf Sonoff.ino.generic.bin
Make sure you change the COM port number in the above command and get the latest firmware here
If there are any subsequent firmware releases, you can then just browse to the switch at http://ipaddress/update and do the update there.
Great job Eric, I’ve loaded your code into a couple EcoPlug’s while i’m waiting for my shipment from china, I wonder if it’s possible to change the Gpio from your SRC and compile a new bin for me.
I’m sure you’ve seen this pic
https://1.bp.blogspot.com/-8-6vCUOCB1E/VrSOD6kSiJI/AAAAAAAAa7E/BYiW-J065ug/s400/pinout.jpg
If i tie the 13 to the 15 i can get the output to work, my button does nothing i figure it’s tied into the wrong GPIO from your code.
Oh the output is inverse to what is in your bin, I can fudge that in smarthings with a button tile.
So I switched some of the GPIOs around as shown in the picture you posted. Try the bin posted here and let me know:
https://drive.google.com/file/d/0B9-VsErgxlRuclFoeGZzcW55cW8/view?usp=sharing
I may still need to reverse the on & off, but I wanted to make sure the pins are right first.
Done, it works perfect.
Thanks a million. Now if Home Depot will put the new ones they have down to clearance price like they did last year.
Oh the output works as it should with the new bin
Glad to hear! Kind of wish my Home Depot had them in stock.
Yeah they unloaded them after Christmas last year for $11.00 Cad a 2 pack, I picked up 6 boxes and returned 2 of them a month later, stupid thinking about it now.
I’ve been using cree connect bulbs that HD had for clearance for $5.00 each, ripping out the zigbee board and using a 120vac to 3.3vdc PS and a relay for my lights around the house. The EcoPlug’s would have been a cheaper option in money and time.
Thanks again
Eric, some of my devices came in from China, I got 2 TH16’s and loaded your code into them. A couple things, the device handler you have 4 lines // out, one is the IP to config, the others work i think but the C to F always stays in the Fahrenheit scale range. I’m in Canada i can figure it out but the kids have no idea what Fahrenheit is, products of the public school system here.
Another thing is the over ride button does nothing.
Scratch the manual PB, it works fine just the people put it together were cheap on the solder.
So it sounds like you got it figured out, but in case not. Manual IPs are now handled in the Sonoff (Connect) App. I may have forgotten to comment out that line, but it should be. It is possible that the setting for F or C is not being pushed to the Sonoff so login to the Sonoff interface and make sure that it is set correctly there.
Well everything works as it should just the F to C thing, I un_commented the IP line in the handler and it allowed me to input my IP in ST and the device started to populate the %RH and Temp from the Sonoff. If you’re talking about the Web interface of the Sonoff? Yes it’s set as C as well in the ST, Still shows F no matter what i do.
The status shows
{“power”:”off”, “uptime”:”21:25:9″, “temperature”:”18.60″, “scale”:”C”, “humidity”:”21.50″}
from the device itself.
Interesting. If you go into the SmartThings IDE -> My Locations -> and the location you are using. What does it say for the “Temperature Scale”?
Well that did it, Its global for the account not per device.
Thanks Again
The device will output C or F as specified, but it is a Smartthings best practice for the handler to convert it to the user’s regional setting so they don’t have different devices reporting different things.
There may be people that use this device outside of Smartthings though.
Any idea? No temp/hum
{“power”:”off”, “uptime”:”0:8:8″, “temperature”:”nan”, “scale”:”F”, “humidity”:”nan”}
Ver:
{“version”:”2.0.0″, “date”:”Jan 21 2017 10:57:27″, “mac”:”60019417428a”}
Which temperature sensor are you using? Also, make sure you press the sensor all the way into the port when the device is “POWRED OFF”. Some of the devices had a defect that did not allow you to press the sensor all the way into the port unless the case is off so test that as well.
Thanks Eric for all your work.. I’m using the DS18B20 needed something submersible. Should I be using something else?
oh.. just caught up on your post on the ST blog.. DS18B20 not supported.. that’s the issue
Yeah, I am still working on adding support for that sensor. I found mine recently so that is a step in the right direction.
Eric i wonder if you could do me another bin, I had a ecoplug “outdoor one” doing my lights in the front of the house, well the seal from the factory is a POS and it filled up with water, i have a couple of these
http://www.electroschematics.com/wp-content/uploads/2015/02/ESP8266-PINOUT.jpg
i wonder if you could compile a new bin with the output on gpio2, the manual button could be on gpio0 but that doesn’t really matter
Thanks
Not sure what to call this one, but try this out: https://drive.google.com/file/d/0B9-VsErgxlRudFVfTWRTTTMyYms/view?usp=sharing
Let me know if I need to adjust anything.
Thanks Eric.
Super easy process. They work great
Hey thanks Eric, I’m away for the rest of the week work but when i get home I’ll load it up and give it a try.
Hi Eric, got home tonight loaded the bin logged in and configured but the output won’t trigger. the display changes state but the physical output won’t. I tried both GPIO 0 and 2 neither change.
That is strange. I have set the physical button up on GPIO 0 and the Relay on GPIO 2. I have recompiled it and posted with the same link just in case I made a mistake. Sorry it took so long to respond. I should be available more this weekend if you have any more problems.
No problem, i’ll give it a shot tomorrow.
Thanks
Oh i tried the bin on several of the esp8266’s thinking maybe one was bad, same results with 5, so i don’t think it’s HW related.
Errr, my mistake, the web control does not change state, when you select on or off the page refreshes like it should but the state remains OFF. I’m going to try the “:sonoff.bin” to see if the state on the web page changes.
Yep just confirmed the S20 bin loads fine but the control current state “OFF” never changes.
Any plans of deleloping a firmware/DH for the sonoff sc?
Also a twin temp sensor would be great.
I have had it on my todo list, but have not had the time.
Hi Eric, I have another request “begging to be honest” I’m building 3- 4 channel Sonoffs to control fans in our barn. I’m using your code and handler but using raw esp 12-e’s for the control, The esp12-e needs Gpio15 to boot so channel 4 output is dead because i have to hold it low to make it run. Is it possible to use Gpio 13 or 16 for channel 4 output ?
It seems that the Esp12-e is much faster to respond to commands then the org Sonoff’s 8285, they should be the same but I can fire the outputs as fast as smartthings can process. but using a script i made the esp12-e can make the change of state in less than 2MS the sonoff can’t do it in anything < 6MS. Weird.
Thanks Again for all your hard work.
Hi Eric,
Great work!
I’m wishing to setup a static IP
most settings are straight forward to me but the entry for IP and HA IP are they the same?
HA IP And HA port I assume are for the sonoff what Is the first IP for?
HA IP & Port are actually for your Home Automation hub. These will be filled in automatically if using SmartThings. You need to fill in IP, Subnet, & Gateway.
Any idea if your firmware would work with the new OTA hijack method of updating firmware. to save cracking open every single one to update?
Love your work btw, these work so well with Smartthings integration.
I looked at the OTA hijack a few months ago and it wasn’t quite finished. I checked it out again and it looks like someone has figured it out. I’ll have to buy a new Sonoff and play around!